Back to Contents Page

Solving Problems

Dell™ U2410 Flat Panel Monitor User's Guide

  Monitor Specific Troubleshooting

  Built-in Diagnostics

  Common Problems

  Video Problems

  Product Specific Problems

  Universal Serial Bus (USB) Specific Problems

  Troubleshooting the Dell™ Soundbar (Optional) 

  Card Reader Troubleshooting


WARNING: Before you begin any of the procedures in this section, follow the Safety Instructions.

Troubleshooting Your Monitor

Self-Test Feature Check (STFC)

Your monitor provides a self-test feature that allows you to check whether your monitor is functioning properly. If your monitor and computer are properly connected but the monitor screen remains dark, run the monitor self-test by performing the following steps:

  1. Turn off both your computer and the monitor.
  2. Unplug the video cable from the back of the computer. To ensure proper Self-Test operation, remove both Digital (white connector) and the Analog (blue connector) cables from the back of computer.
  3. Turn on the monitor.

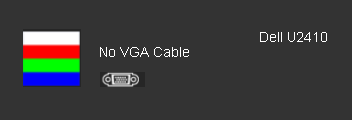
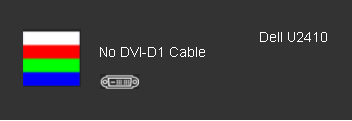
    The floating dialog box should appear on-screen (against a black background) if the monitor cannot sense a video signal and is working correctly. While in self-test mode, the power LED remains blue. Also, depending upon the selected input, one of the dialogs shown below will continuously scroll through the screen.

    or

    or


  4. This box also appears during normal system operation if the video cable becomes disconnected or damaged.
  5. Turn off your monitor and reconnect the video cable; then turn on both your computer and the monitor.

If your monitor screen remains blank after you use the previous procedure, check your video controller and computer system, because your monitor is functioning properly.

NOTE: Self-test feature check is not available for Composite, and Component video modes.

Built-in Diagnostics

Your monitor has a built-in diagnostic tool that helps you determine if the screen abnormality you are experiencing is an inherent problem with your monitor, or with your computer and video card.
NOTE: You can run the built-in diagnostics only when the video cable is unplugged and the monitor is in self-test mode.

To run the built-in diagnostics:

  1. Ensure that the screen is clean (no dust particles on the surface of the screen).
  2. Unplug the video cable(s) from the back of the computer or monitor. The monitor then goes into the self-test mode.
  3. Press and hold the first and fourth buttons on the front panel, simultaneously for 2 seconds. A gray screen appears.

  1. Carefully inspect the screen for abnormalities.
  2. Press the fourth button on the front panel again. The color of the screen changes to red.
  3. Inspect the display for any abnormalities.
  4. Repeat steps 5 and 6 to inspect the display in green, blue, and white colored screens.

The test is complete when the white screen appears. To exit, press the fourth button again. 

If you do not detect any screen abnormalities upon using the built-in diagnostic tool, the monitor is functioning properly. Check the video card and computer.


OSD Warning Messages

For OSD-related issues, see OSD Warning Messages.


Common Problems

The following table contains general information about common monitor problems you might encounter.

Common Symptoms

What You Experience

Possible Solutions

No Video/Power LED off No picture
  • Ensure that the video cable connecting the monitor and the computer is properly connected and secure.
  • Verify that the power outlet is functioning properly using any other electrical equipment.
  • Ensure that the power button is depressed fully.
No Video/Power LED on No picture or no brightness
  • Increase brightness & contrast controls via OSD.
  • Perform monitor self-test feature check.
  • Check for bent or broken pins in the video cable connector.
  • Touch button 5 located above the power button, ensure that the correct input source is selected via the Input Source Select menu.
  • Run the built-in diagnostics.
Poor Focus Picture is fuzzy, blurry, or ghosting
  • Perform Auto Adjust via OSD.
  • Adjust the Phase and Pixel Clock controls via OSD.
  • Eliminate video extension cables.
  • Reset the monitor to Factory Settings.
  • Change the video resolution to the correct aspect ratio (16:10).
Shaky/Jittery Video Wavy picture or fine movement
  • Perform Auto Adjust via OSD.
  • Adjust the Phase and Pixel Clock controls via OSD.
  • Reset the monitor to Factory Settings.
  • Check environmental factors.
  • Relocate the monitor and test in another room.
Missing Pixels LCD screen has spots
  • Cycle power on-off.
  • Pixel that is permanently off is a natural defect that can occur in LCD technology.

For more information on Dell Monitor Quality and Pixel Policy, see Dell Support site at: support.dell.com.

Stuck-on Pixels LCD screen has bright spots
  • Cycle power on-off.
  • Pixel that is permanently off is a natural defect that can occur in LCD technology.

For more information on Dell Monitor Quality and Pixel Policy, see Dell Support site at: support.dell.com.

Brightness Problems Picture too dim or too bright
  • Reset the monitor to Factory Settings.
  • Auto Adjust via OSD.
  • Adjust brightness & contrast controls via OSD.
Geometric Distortion Screen not centered correctly
  • Reset the monitor to Factory Settings.
  • Auto Adjust via OSD.
  • Adjust brightness & contrast controls via OSD.

NOTE: When using 'DVI-D', the positioning adjustments are not available.

Horizontal/Vertical Lines Screen has one or more lines
  • Reset the monitor to Factory Settings.
  • Perform Auto Adjust via OSD.
  • Adjust Phase and Pixel Clock controls via OSD.
  • Perform monitor self-test feature check and determine if these lines are also in self-test mode.
  • Check for bent or broken pins in the video cable connector.

NOTE: When using 'DVI-D', the Pixel Clock and Phase adjustments are not available.

Synchronization Problems Screen is scrambled or appears torn
  • Reset the monitor to Factory Settings.
  • Perform Auto Adjust via OSD.
  • Adjust Phase and Pixel Clock controls via OSD.
  • Perform monitor self-test feature check to determine if scrambled screen appears in self-test mode.
  • Check for bent or broken pins in the video cable connector.
  • Restart the computer in the safe mode.
Safety-Related Issues Visible signs of smoke or sparks
  • Do not perform any troubleshooting steps.
  • Contact Dell immediately.
Intermittent Problems Monitor malfunctions on & off
  • Ensure that the video cable connecting the monitor to the computer is connected properly and is secure.
  • Reset the monitor to Factory Settings.
  • Perform monitor self-test feature check to determine if the intermittent problem occurs in self-test mode.
Missing Color Picture missing color
  • Perform monitor self-test feature check.
  • Ensure that the video cable connecting the monitor to the computer is connected properly and is secure.
  • Check for bent or broken pins in the video cable connector.
Wrong Color Picture color not good
  • Change the Color Setting Mode in the Color Settings OSD to Graphics or Video depending to the application.
  • Try different Color Preset Settings in Color Settings OSD. Adjust R/G/B value in Color Settings OSD if the Color Management is turned off.
  • Change the Input Color Format to PC RGB or YPbPr in the Advance Setting OSD.
Image retention  from a static image left on the monitor for a long period of time Faint shadow from the static image displayed appears on the screen
  • Use the Power Management feature to turn off the monitor at all times when not in use (for more information, see Power Management Modes).
  • Alternatively, use a dynamically changing screensaver.


Video Problems

COMMON SYMPTOMS

WHAT YOU EXPERIENCE

POSSIBLE SOLUTIONS

No Video

No signal indicator is displayed

  • Check Video Input Selection
    • Composite: Yellow colored RCA jack
    • Component: Red, Blue, Green colored RCA jacks 

Low Quality DVD playback

Picture not crisp and some color distortion

  • Check DVD connection
    • Composite gives good picture
    • Component: Red, Blue, Green colored RCA jacks
Blinking Video Video is blinking or discontinuous
  • Check DVD connection

    • Composite gives good picture

    • Component: Red, Blue, Green colored RCA jacks  

  • Check if DVD player is HDCP compliant.

    • Some non-compliant players may exhibit blinking video and others will display a raster screen.


Product Specific Problems

SPECIFIC SYMPTOMS WHAT YOU EXPERIENCE POSSIBLE SOLUTIONS
Screen image is too small Image is centered on screen, but does not fill entire viewing area
  • Perform monitor reset on "Factory Reset".
Cannot adjust the monitor with the buttons on the front panel OSD does not appear on the screen
  • Turn the monitor off and unplug the power cord and then plug back and power on.
The monitor will not go into power saving mode. No picture, the LED light is blue. When press "+", "-" or "Menu" key, the message " No Composite input signal "  or " No Component input signal " will appear.
  • Move mouse or hit any key on the keyboard on the computer or activate video player, then access the OSD to set  Audio to "off " state.
No Input Signal when you press the controls. No picture, the LED light is blue. When you press "+", "-" or "Menu" key, the message " No Composite input signal " or " No Component input signal " will appear.
  • Check the signal source Make sure the Computer is not in power saving by moving the mouse or pressing any key on the keyboard.
  • Check to make sure Video Source to Composite or Component is powered and playing video media.
  • Check whether the signal cable is plugged in and seated properly. Re-plug the signal cable if necessary.
  • Re-boot the computer or video player.
The monitor will not fill the entire screen. The picture can't fill the height or width of the screen.
  • Due to the non-standard formats of DVDs, the monitor may not show the full screen pictures.

NOTE: When choosing DVI-D, DisplayPort, HDMI, Composite or Component video, Auto Adjust function is not available.


Universal Serial Bus (USB) Specific Problems

SPECIFIC SYMPTOMS WHAT YOU EXPERIENCE POSSIBLE SOLUTIONS
USB interface is not working USB peripherals are not working
  • Check that your monitor is powered ON.
  • Reconnect the upstream cable to your computer.
  • Reconnect the USB peripherals (downstream connector). 
  • Switch off and then turn on the monitor again.
  • Reboot the computer.
High Speed USB 2.0 interface is slow. High Speed USB 2.0 peripherals working slowly or not at all.
  • Check that your computer is USB 2.0 capable.
  • Verify USB 2.0 source on your computer.
  • Reconnect the upstream cable to your computer.
  • Reconnect the USB peripherals (downstream connector). 
  • Reboot the computer.


Troubleshooting the Dell™ Soundbar

COMMON SYMPTOMS

WHAT YOU EXPERIENCE

POSSIBLE SOLUTIONS

No Sound No power to Soundbar - the power indicator is off.
(built-in DC power supply. i.e. U2410)
  • Turn the Power/Volume knob on the Soundbar clockwise to the middle position; check if the power indicator (blue LED) on the front of the Soundbar is illuminated.
  • Confirm that the power cable from the Soundbar is plugged into the monitor.
  • Confirm that the monitor has power.
  • If the monitor has no power, see Monitor Specific Troubleshooting for monitor common problem.
No Sound Soundbar has power - power indicator is on.
  • Plug the audio line-in cable into the computer's audio out jack.
  • Set all Windows volume controls to their maximum.
  • Play some audio content on the computer (i.e. audio CD, or MP3).
  • Turn the Power/Volume knob on the Soundbar clockwise to a higher volume setting.
  • Clean and reseat the audio line-in plug.
  • Test the Soundbar using another audio source (i.e. portable CD player).
Distorted Sound Computer's sound card is used as the audio source.
  • Clear any obstructions between the Soundbar and the user.
  • Confirm that the audio line-in plug is completely inserted into the jack of the sound card.
  • Set all Windows volume controls to their midpoints.
  • Decrease the volume of the audio application.
  • Turn the Power/Volume knob on the Soundbar counter-clockwise to a lower volume setting.
  • Clean and reseat the audio line-in plug.
  • Troubleshoot the computer's sound card.
  • Test the Soundbar using another audio source (i.e. portable CD player).
Distorted Sound Other audio source is used.
  • Clear any obstructions between the Soundbar and the user.
  • Confirm that the audio line-in plug is completely inserted into the jack of the audio source.
  • Decrease the volume of the audio source.
  • Turn the Power/Volume knob on the Soundbar counter-clockwise to a lower volume setting.
  • Clean and reseat the audio line-in plug.
Unbalanced Sound Output Sound from only one side of Soundbar
  • Clear any obstructions between the Soundbar and the user.
  • Confirm that the audio line-in plug is completely inserted into the jack of the sound card or audio source.
  • Set all Windows audio balance controls (L-R) to their midpoints.
  • Clean and reseat the audio line-in plug.
  • Troubleshoot the computer's sound card.
  • Test the Soundbar using another audio source (i.e. portable CD player).
Low Volume Volume is too low.
  • Clear any obstructions between the Soundbar and the user.
  • Turn the Power/Volume knob on the Soundbar clockwise to the maximum volume setting.
  • Set all Windows volume controls to their maximum.
  • Increase the volume of the audio application.
  • Test the Soundbar using another audio source (i.e. portable CD player).


Troubleshooting the Card Reader 

CAUTION: Do not remove the device while reading or writing media. Doing so may cause loss of data or malfunction in the media.
Problem Cause Solution
Drive letter is not assigned.
(Windows® XP only)
Conflict with network drive letter. A. Right-click My Computer on the desktop, and then click Manage. Under Computer Management, click Desk Management.

B. In the list of drives in the right panel, right-click Removable Device and then click Change Drive Letter and Paths.

C. Click Change, and in the drop-down box, specify a drive letter for the Removable Device, choosing one that is not assigned to the mapped network drives.

D. Click OK, ... then click OK again

Drive letter is assigned, but the media is not accessible

 
The media needs reformatting. Right-click the drive in Explorer and choose Format from the resulting menu.
The media has been ejected during writing or erasing. Displays the error message, "Error copying file or folder."

Displays the error message, "Cannot write folder (folder name) or file (file name)," during writing, or, "Cannot remove folder (folder name) or file(file name),". While erasing, you cannot write or erase in the same folder or file name.

 
Reinsert the media and write or erase again.

Format the media for writing or erasing the same folder or file name.


Despite the disappearance of the pop-up window, the media has been ejected while the LED was blinking.

 
Although the pop-up window disappears during writing, if you eject your media while the LED is still blinking, then you cannot complete your action on the media. Format the media for writing or erasing the same folder or file name.
Cannot format or write on the media. Write protect switch is enabled. Verify that the write- protect switch of the media is unlocked.
Card reader is not working USB interface is not working.

Check that your monitor is powered on.

Reconnect the upstream cable from your computer to the monitor.

Reinsert the media.

Switch off and then turn on the monitor again.

Reboot the computer.


Back to Contents Page